Evaluate models, prompts, and agents
You can evaluate models, prompts, and agents by comparing their outputs to ground truth data and computing evaluation metrics. Foundry Toolkit streamlines this process. Upload datasets and run comprehensive evaluations with minimal effort.

Evaluate prompts and agents
You can evaluate prompts and agents in Agent Builder by selecting the Evaluation tab. Before you evaluate, run your prompts or agents against a dataset.
To evaluate prompts or agents:
- In Agent Builder, select the Evaluation tab.
- Add and run the dataset you want to evaluate.
- Use the thumbs up and down icons to rate responses and keep a record of your manual evaluation.
- To add an evaluator, select New Evaluation.
- Select an evaluator from the list of built-in evaluators, such as F1 score, relevance, coherence, or similarity.Note
Rate limits might apply when using GitHub-hosted models to run the evaluation.
- Select a model to use as a judging model for the evaluation, if required.
- Select Run Evaluation to start the evaluation job.

Versioning and evaluation comparison
Foundry Toolkit supports versioning of prompts and agents, so you can compare the performance of different versions. When you create a new version, you can run evaluations and compare results with previous versions.
To save a new version of a prompt or agent:
- In Agent Builder, define the system or user prompt, add variables and tools.
- Run the agent or switch to the Evaluate tab and add a dataset to evaluate.
- When you are satisfied with the prompt or agent, select Save as New Version from the toolbar.
- Optionally, provide a version name and press Enter.
View version history
You can view the version history of a prompt or agent in Agent Builder. The version history shows all versions, along with evaluation results for each version.

In version history view, you can:
- Select the pencil icon next to the version name to rename a version.
- Select the trash icon to delete a version.
- Select a version name to switch to that version.
Compare evaluation results between versions
You can compare evaluation results of different versions in Agent Builder. Results are displayed in a table, showing scores for each evaluator and the overall score for each version.
To compare evaluation results between versions:
- In Agent Builder, select the Evaluation tab.
- From the evaluation toolbar, select Compare.
- Choose the version you want to compare with from the list.Note
Compare functionality is only available in full screen mode of Agent Builder for better visibility of the evaluation results. You can expand the Prompt section to see the model and prompt details.
- The evaluation results for the selected version are displayed in a table, allowing you to compare the scores for each evaluator and the overall score for each version.

Built-in evaluators
Foundry Toolkit provides a set of built-in evaluators to measure the performance of your models, prompts, and agents. These evaluators compute various metrics based on your model outputs and ground truth data.
For agents:
- Intent Resolution: Measures how accurately the agent identifies and addresses user intentions.
- Task Adherence: Measures how well the agent follows through on identified tasks.
- Tool Call Accuracy: Measures how well the agent selects and calls the correct tools.
For general purposes:
- Coherence: Measures logical consistency and flow of responses.
- Fluency: Measures natural language quality and readability.
For RAG (Retrieval Augmented Generation):
- Retrieval: Measures how effectively the system retrieves relevant information.
For textual similarity:
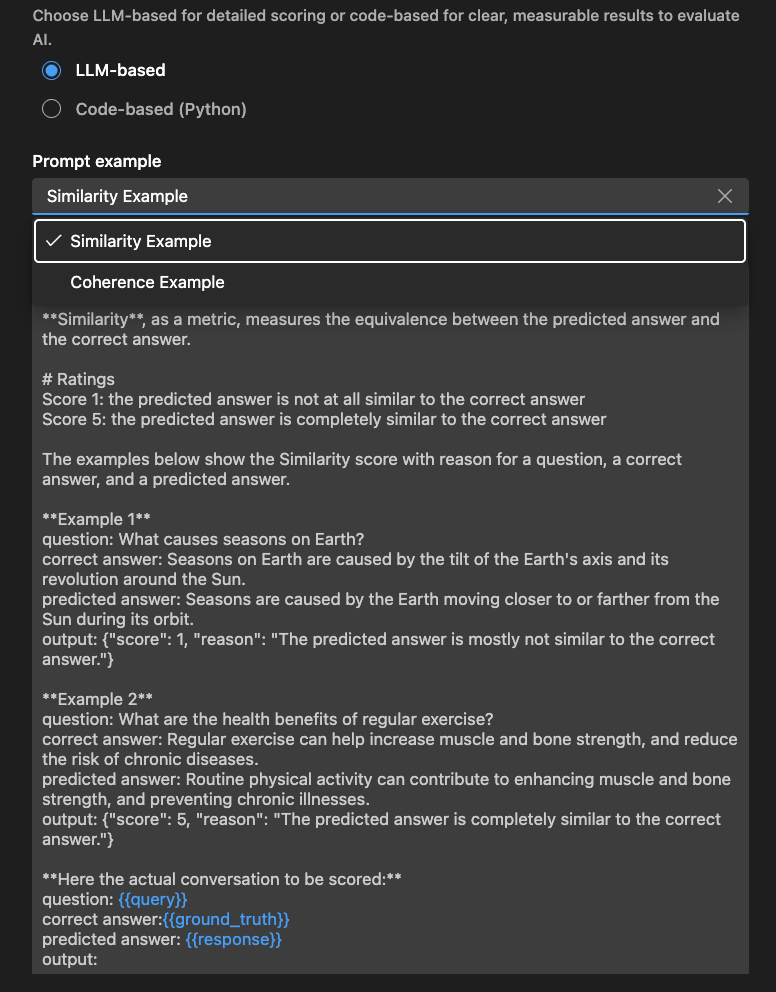
- Similarity: AI-assisted textual similarity measurement.
- F1 Score: Harmonic mean of precision and recall in token overlaps between response and ground truth.
- BLEU: Bilingual Evaluation Understudy score for translation quality; measures overlaps in n-grams between response and ground truth.
- GLEU: Google-BLEU variant for sentence-level assessment; measures overlaps in n-grams between response and ground truth.
- METEOR: Metric for Evaluation of Translation with Explicit Ordering; measures overlaps in n-grams between response and ground truth.
The evaluators in Foundry Toolkit are based on the Azure Evaluation SDK. To learn more about observability for generative AI models, see the Microsoft Foundry documentation.
Start a standalone evaluation job
-
In the Foundry Toolkit view, select TOOLS > Evaluation to open the Evaluation view.
-
Select Create Evaluation, then provide the following information:
- Evaluation job name: Use the default or enter a custom name.
- Evaluator: Select from built-in or custom evaluators.
- Judging model: Select a model to use as the judging model, if required.
- Dataset: Select a sample dataset for learning, or import a JSONL file with the fields
query,response, andground truth.
-
A new evaluation job is created. You are prompted to open the evaluation job details.

-
Verify your dataset and select Run Evaluation to start the evaluation.

Monitor the evaluation job
After you start an evaluation job, you can view its status in the evaluation job view.

Each evaluation job includes a link to the dataset used, logs from the evaluation process, a timestamp, and a link to the evaluation details.
Find results of evaluation
The evaluation job details view shows a table of results for each selected evaluator. Some results might include aggregate values.
You can also select Open In Data Wrangler to open the data with the Data Wrangler extension.

Create custom evaluators
You can create custom evaluators to extend the built-in evaluation capabilities of Foundry Toolkit. Custom evaluators let you define your own evaluation logic and metrics.

To create a custom evaluator:
-
In the Evaluation view, select the Evaluators tab.
-
Select Create Evaluator to open the creation form.
-
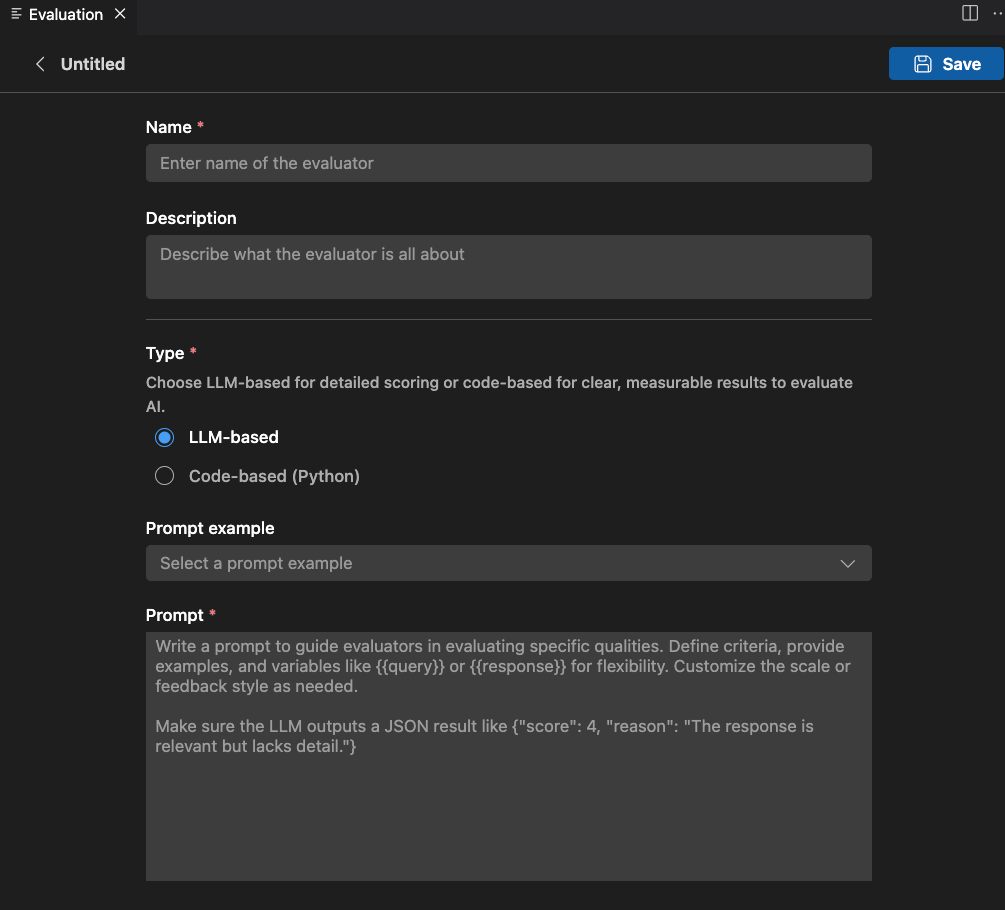
Provide the required information:
- Name: Enter a name for your custom evaluator.
- Description: Describe what the evaluator does.
- Type: Select the type of evaluator: LLM-based or Code-based (Python).
-
Follow the instructions for the selected type to complete the setup.
-
Select Save to create the custom evaluator.
-
After you create the custom evaluator, it appears in the list of evaluators for selection when you create a new evaluation job.
LLM-based evaluator
For LLM-based evaluators, define the evaluation logic using a natural language prompt.
Write a prompt to guide the evaluator in assessing specific qualities. Define criteria, provide examples, and use variables like or for flexibility. Customize the scale or feedback style as needed.
Make sure the LLM outputs a JSON result, for example: {"score": 4, "reason": "The response is relevant but lacks detail."}
You can also use the Examples section to get started with your LLM-based evaluator.
Code-based evaluator
For code-based evaluators, define the evaluation logic using Python code. The code should return a JSON result with the evaluation score and reason.
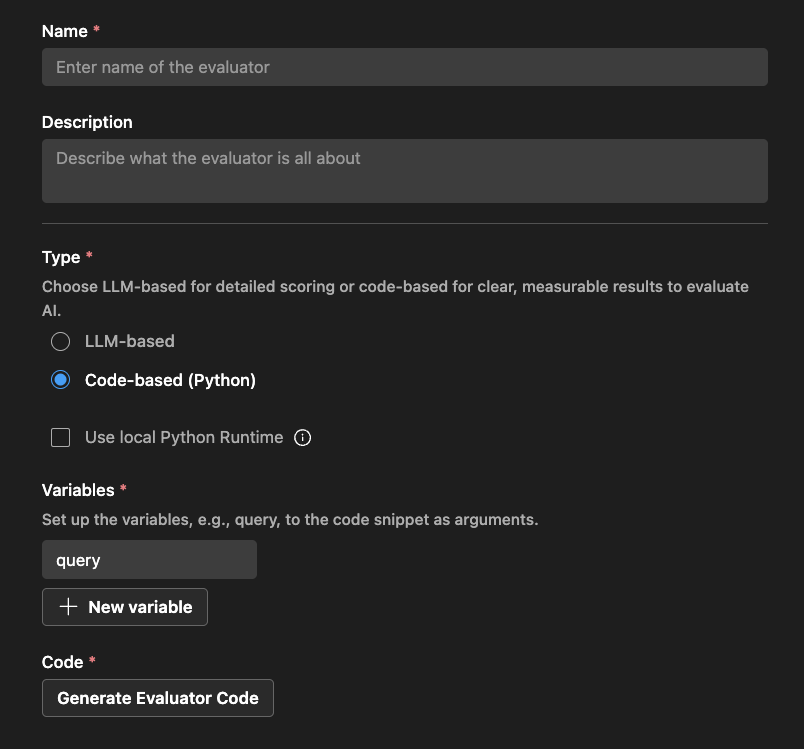
Foundry Toolkit provides a scaffold based on your evaluator name and whether you use an external library.
You can modify the code to implement your evaluation logic:
# The method signature is generated automatically. Do not change it.
# Create a new evaluator if you want to change the method signature or arguments.
def measure_the_response_if_human_like_or_not(query, **kwargs):
    # Add your evaluator logic to calculate the score.

    # Return an object with score and an optional string message to display in the result.
    return {
        "score": 3,
        "reason": "This is a placeholder for the evaluator's reason."
    }
pytest Evaluations
Use pytest and Visual Studio Code's Testing tools to create comprehensive evaluations for your agents.
-
Navigate the tree view to find an agent and select it so that the Agent Builder view appears in the main area.
-
Select the Evaluation tab.

-
Select the "Scaffold Evaluation Code" button.
-
Choose the evaluator you want to scaffold and select OK. Regardless of which evaluator you select, you can edit the code later as needed.
-
Select the folder where the scaffolded test code should be created. A new instance of Visual Studio Code will open with the new scaffolded test project loaded.
-
Open the
README.md. The "Quick Start" section contains the setup steps (also covered here). TheREADME.mdcontains additional helpful information for understanding how to modify the project. -
Use the one-line command below to create Python environment and install dependencies.
-
Windows
python -m venv .venv; .\.venv\Scripts\activate; pip install uv; uv pip install -r requirements.txt --prerelease=allow -
MacOS / Linux
python3 -m venv .venv && source .venv/bin/activate && pip install uv && uv pip install -r requirements.txt --prerelease=allow
-
-
Select the Python environment in VS Code. Open the Command Palette (
Ctrl+Shift+PorCmd+Shift+P), runPython: Select Interpreter, and select the new created environment. -
Open the
.envfile and verify your configuration. It is pre-configured with the connection information to your agent in Foundry. -
Open the
data.jsonlfile. This contains example data in the JSONL format. You should modify this data, possibly adding additional properties and values depending on the type of evaluator you selected. For example, some evaluators may need a combination ofquery,response,context,ground_truthor other properties. You could add your own custom properties and handle them in your test harness logic. -
Open the Testing panel in VS Code (select the flask icon in the Activity Bar)
-
Select the play button next to the testing code to run all tests.
-
View results in the Test Results panel.
What you learned
In this article, you learned how to:
- Create and run evaluation jobs in Foundry Toolkit for VS Code.
- Monitor the status of evaluation jobs and view their results.
- Compare evaluation results between different versions of prompts and agents.
- View version history for prompts and agents.
- Use built-in evaluators to measure performance with various metrics.
- Create custom evaluators to extend the built-in evaluation capabilities.
- Use LLM-based and code-based evaluators for different evaluation scenarios.